DIY Sheds - Lots of Designs
15 free shed building plans.
Many of them will include a material list and are super easy to follow.
Get your garden or storage shed started with the help of these instructions.
Remember to check with your local building authorities for the requirements and permits you may need.
By planning carefully before you build your shed you can avoid problems and can as well save money.
Free Shed Building Plans
Page:
 Gable
Shed Plans
Gable
Shed Plans
www.diygardenplans.net
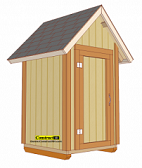 Small
Garden Tool Shed
Small
Garden Tool Shed
www.construct101.com
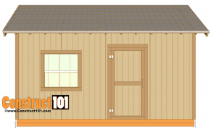
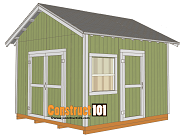 12x12
Shed Plans - Gable Shed
12x12
Shed Plans - Gable Shed
www.construct101.com
 12x16
Storage Shed Plans
12x16
Storage Shed Plans
www.construct101.com
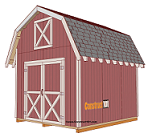 Gambrel
- Barn Shed
Gambrel
- Barn Shed
www.construct101.com
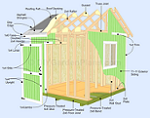
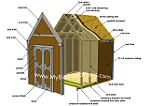 How
to build a gable storage shed
How
to build a gable storage shed
www.mybackyardplans.com
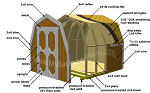 How
to build a gambrel storage shed
How
to build a gambrel storage shed
www.mybackyardplans.com
Page:
You May Also Like:
 Gambrel
(barn style)
Gambrel
(barn style)
Lots of space for storage. Details for loft included. Size available - (12x12) (12x10) (10x12) (10x10)
 Lean
To
Lean
To
This storage will not take up allot of space. Can be put against the house or fence. Size available - (4x8)
 Great
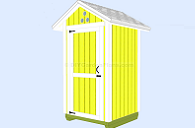
For Garden Tools
Great
For Garden Tools
Keep your garden tools organized and inside a safe location. Size available - (4x4)
 Salt
Box Shed Plans
Salt
Box Shed Plans
Great for garden or as storage - PDF download - (10x8)
7 Tips for Building a Shed
-
1. Clear and Level the Area
Before you begin the construction of your shed you will need to clear and level the area. If you are building a wood floor you will need to keep it away from ground to prevent rot. You can either set the foundation on cinder blocks or set it on top of gravel (3-4 inches thick) this will prevent moisture from the ground.
-
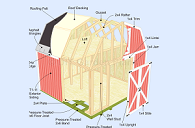
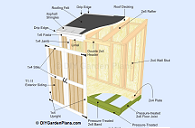
2. Construct the Foundation
The construction of a wood foundation is usually built using pressure-treated 2x6 lumbers. These parts are called the band on the ends and the joist in the middle of the band, spaced out 16-24 inches apart. The foundation frame will sit on top of pressure-treated 4x4 posts called skids. The skids will set on the cinder blocks or on top of gravel to prevent rot.
Cutting 45 degree angle cuts on the skids will allow the shed to be dragged easier if needed. Once the frame has been squared and leveled you can install the floor deck and nail it to the frame.
-
3. Assemble the Walls
Now that the floor is completed you can assemble the wall frame on the leveled floor. You can build the wall frames using 2x4 lumbers. The top and bottom 2x4’s are called plates. Place the 2x4 wall studs 16-24 inches apart and nail through the plates and into the wall studs. While the wall frame is still on the ground you can install the siding to make it easier. When the wall is completed rise up and nail it into the floor.
-
4. Assemble the Roof Truss
The roof truss can be built using 2x4 or 2x6 lumbers. There are different ways to build the truss, the most common is cutting out the rafters and assembling them using gussets. The easiest way to build the roof truss will be using plans. The other option will be to lay the 2x4’s or 2x6’s on the level floor set them how you want your roof and make a template. Once you are happy with the look of your template you can build the rest.
-
5. Install Siding and Windows
If you will be adding a window you will need to cut out the wall and frame it for the size of the window. The siding will need to be installed following the manufactures instructions.
-
6. Build the Shed Door
The shed door can be built using exterior plywood. Install 1x4 trim around the door and to the door opening. Add hinges to the trim on the door opening and secure to the door.
-
7. Install Trim and Paint
When the shed is complete you can make it look nicer by installing trim and painting it. Install 1x4 trim to the four corner walls and wherever the siding meets.
If you feel you can build a shed yourself than more than likely you can regardless if you have never built one before. Begin by getting familiar with the vocabulary used on the plans. Most will provide drawings along with the name of all the parts.
Before Choosing Plans
Do not make the mistake of not building your own shed because you have never done it before. With the right shed plans you will get the same results the experts get. Begin by choosing plans you feel comfortable with and know you can follow along. Simply follow the steps provided, measure correctly, and in no time you will construct your own shed. Study the building guide to get familiar with all the steps and to get to know the names of all the parts.
Plans will not only make this building task easier, by giving you all the measurements to all the parts, you can as well get a good idea of the cost to complete this project.
When you are searching for plans be aware of the building requirements for your area. Most places will allow sheds as big as 12x10 without obtaining a building permit. Smaller wood sheds such as 4x4, 4x6, and 4x8, used to store garden tools usually will not require a permit.
Shed Design Description
| Shed Style | Description |
|---|---|
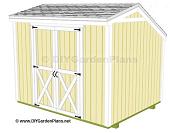
| Gable Shed | Two even roof pitches. |
| Gambrel Shed | Resembles a barn. For pitches. |
| Lean To Shed | One pitch on roof. Space saver. |
| Salt Box Shed | Two uneven pitches on roof. |
The design of the shed you choose will depend on what you will be using it for and were it will be located. If you just need a small shed to place garden equipment, a lean to shed can be ideal. This design of shed will not take much room and it can be placed next to a fence or wall. The lean to shed has a single sloped roof design. It is one of the most common for garden tools as well as pool equipment and chemicals.
If you need lots of space for storage, garden room, or office space, the most common design will be the gable shed. The gable roof design has two sloped roof that resembles a little house. This design is the most popular because it blends will with your home. The gambrel shed resembles a barn. It is great for storage as no space will go to waste. A larger size gambrel shed will have enough room to build a loft. Having a loft will keep everything organized and allow you to store more stuff. By installing a ramp to the shed you can also store ATV, snowmobiles, jet skis, trailers, and such things.
Online Shed Plans
By searching online you can find some free shed plans that are decent. Most often though these plans will be geared towards more experienced builders and they will not be very detailed. If you are a first time builder look for plans you can understand, even if it means paying a little. Use plans that contain a material list and plenty of details if this is your first time. Most free plans available are not as detailed with the building steps, so free is not always a good idea. If you go to the top of this page I have provided a list of some of the best plans from reputable websites.
Are Plans Required?
The toughest and most important part of building a shed is finding the right plans. Sure you can just start building without plans, but do you know how it will look when you are done? Or you can search for free plans, but are they designed right? What I recommend is finding plans, even if it means you have to pay a little. Make sure that sample plans are provided so you know what you are getting. Do not make a purchase just because they show lots of nice sheds but no sample of the actual plans you will be buying. Look for the following before you decide to purchase:
- A material list and a shopping list
- Step-by-step detailed drawings
- Instructions that are easy to follow
- Plenty of details for measurements and assembly